2 Making Online Store with WordPress
WordPress (WP) is one of the most widely used CMS by many people. In addition to being easy, WP also very SEO Friendly so widely used. In this chapter, will be exemplified how to create an online store using WordPress. WP used here using WP Self-Hosted (hostingitself), because WP free (wordpress.com) not supported Plugins WP E-Commerce.
First of all you can download Plugins WP E-Commerce http://wordpress.org/extend/plugins/WP-e-commerce/, after You can download mengistal into your WP. the following steps:
1. To enter into the WordPress admin dashboard, enter username and password blogs and press Log In.
 |
| 2.1 Log into your account WordPress CMS |
2. Upon entry into the WordPress dashboard, select the Plugins menu and click Add New.
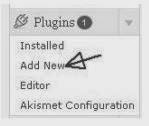 |
| 2.2 Click Add New in the Plugins menu |
3. If you have entered into the Install Plugins page, step to do is press the Upload link.
 |
| 2.3 Click Upload |
4. After that, press the Browse button to search for plugins WP eCommerce ZIP format you have downloaded earlier. if have found these plugins, click Open to continue to the next stage.
 |
| 2.4 Click Browse |
5. Then click the Install Now button, and wait until the process upload and plugins installation is complete.
 |
| 2.5 Click the Install Now button |
 |
| 2.6 Plugins have been successfully installed |
6. You can enable plugins WP E-Commerce by means press the link "Activate Plugin" (see Figure 2.6) or enter Installed into the page and click on the option Installed was in the Plugins menu.
 |
| 2.7 Click on the menu Installed Plugins |
7. Then look for plugins WP E-Commerce (WP Shopping Cart) which is not yet active. Activate the plugin by clicking Activate. So that is the active plugins and you just do setting in it.
 |
| 2.8 Activate the plugin WP E-Commerce |
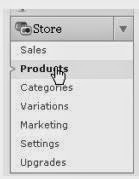
8. If the plugin is active, there will be a new menu on the dashboard that is Store. In the Store menu that you can build online stores at your own WordPress blog.
 |
| 2.9 Products menu on the dashboard |
The initial phase to build an online store on your WordPress blog, step you take is to do the settings. in this discussion will not be discussed all the tools in the Products menu, because here are discussed only tools that function to create an online store as well as tools for transactions in in these blogs. To do so, the following steps.
1. Go into the Settings option on the menu Store.
 |
| 2.10 Click Settings in the menu Products |
2. After entering into the Settings page, you can do setting begins at the General settings. On a page that You can set up the Base / Country region :Language, and Target Market. In addition it is also set to section currency that will be used, if the market share it can be selected from Indonesia Indonesian Rupiah (S). After making the setting on General, to save the results of the changes click the Update button.
 |
| 2.11 Setting the General options |
 |
| 2.12 Save the settings by clicking Update results |
3. Then you can make settings in the options Presentation. In this setting you can adjust both the Button Settings, Product Settings, Product Pages settings, Thumbnail Settings, until Paginations settings. for more You can note the details on Figure 2.13 if have after doing the settings on the Presentations option click the Update button to save the changes.
 |
| 2.13 Button Settings Settings and Product Settings |
 |
| 2.14 Setting Product Page Settings and Shopping Cart Settings |
 |
| 2.15 Setting Product Group Settings and Thumbnails Settings |
 |
| 2.16 Click Updates to save the settings |
NOTE:
In the arrangement, in an arrangement Presentations which is not absolute, because you can do the other settings according to the needs of the online store you will make.
4. The next setting is the option Shipping. Shipping is setting serves like a function of the delivery goods and postage (postage). You can choose settings delivery of goods according to the weight of goods and distance shipping. In this example the postage is calculated from heavy goods. If you have finished setting a Shipping option, later on press the Update button.
 |
| 2.17 Entry into setting Shipping |
 |
| 2.18 Setting postage costs based on the weight of goods |
5. The next setting is on Payment Options, which serves for payment arrangements. Payments could be made manually or using virtual currency such as Paypal and others. In this example using payment manually (Manual Payment) to provide information payment order (transaction) to prospective buyers. After making the settings press the button to save Updates setting results.
 |
| 2.19 Perform the settings in the options Payment Options |
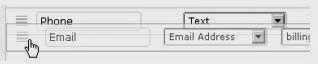
6. Setting In Your form field Billing / Contact is form data themselves buyers. In the form below, namely Shippings detail is a form for the purpose of sending goods. In both these forms you can remove form unused or replace the Name by words in your language (Indonesian).
 |
| 2.20 Entry into setting Checkout |
 |
| 2.21 Perform the settings in the options Checkout |
7. To set the order of the requested information, you can set it to perform a drag-and-drop. After making the settings, save it by pressing the Save Changes button.
 |
| 2.22 Drag and drop to arrange the order of information |
After completing the setup and install the widget support, you can begin adding products into your online store. To do so, the following steps.
1. Go into the menu option
Products in
Store.
 |
| 2.23 Go into the options Products |
2. After that you can enter a product to be marketed to the online store. Starting from the product name, description, price (in the writing of currency USD, for example 48000.00), category and brand (category and brand is a grouping by categories of products and brands, such as HP category Qwerty with brand Nokia), Shipping, and upload images of products . After completing the settings press the Add New Product.
 |
| 2.24 Load product names, prices and discounts and write down the main description of the product |
 |
| 2.25 Adding additional description, category settings, and the settings Price and Stock Control |
 |
| 2.26 Upload product images into an online store |
 |
| 2.27 Click Add New Product to add products to the online store |
Once completed, you can see the results that WordPress blogs that have a normal appearance, changed the display according to the online store and are given the tools to realize business blog online store.
 |
| 2.28 Blogs online store |
Hi. I’m Designer of Blog Magic. I’m CEO/Founder of ThemeXpose. I’m Creative Art Director, Web Designer, UI/UX Designer, Interaction Designer, Industrial Designer, Web Developer, Business Enthusiast, StartUp Enthusiast, Speaker, Writer and Photographer. Inspired to make things looks better.
0 komentar:
Posting Komentar